
Hello everyone!!
I’ve been mulling over whether I should’ve titled this post “A tool to monitor it all…” you know, like a Lord of the Rings vibe, but then I figured it’d probably be easier to find if the title wasn’t so geeky. Guess I’m getting old…
Anyway, since I can play around with the image, I asked ChatGPT to generate one with that spirit (like I do for all the post images), and I have to say I love how it turned out.
Alright, let’s get to it. This post is going to be the first purely technical one, so don’t panic, we’ll get back to less techie stuff later on.
I want to take the chance to mention a couple of references. First, Microsoft’s official documentation on this topic (https://learn.microsoft.com/en-us/purview/archive-chatgpt-interactions) and Jon Nordstrom’s post on the Microsoft Security community blog (https://techcommunity.microsoft.com/blog/microsoft-security-blog/unlocking-the-power-of-microsoft-purview-for-chatgpt-enterprise/4371239), which is honestly way more useful than the official docs. Even so, we still ran into some challenges that I’ll walk you through in case I can help save you some headaches.
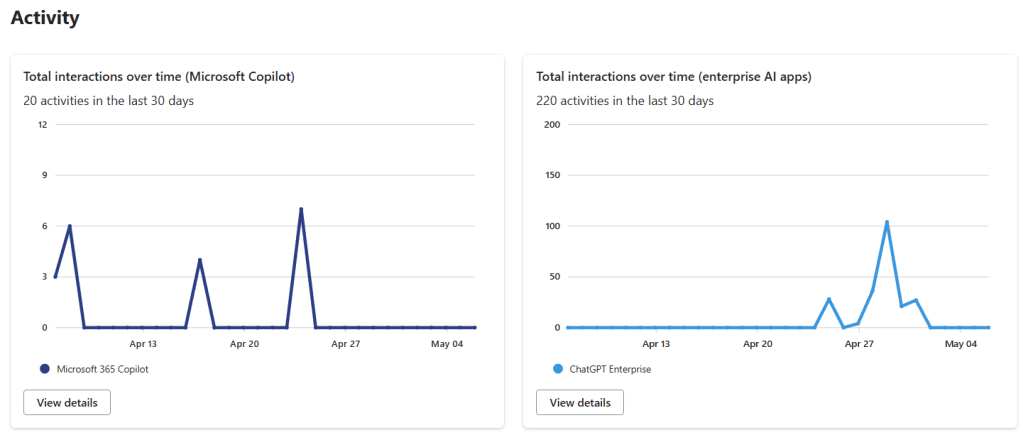
So, the goal here is to monitor interactions with ChatGPT Enterprise using Purview, just like we do with Copilot, and also be able to investigate those interactions with eDiscovery. The thing is that in order to make this work, Microsoft decided to integrate it using Purview Data Map capabilities, which no so long ago, was called Azure Data Map, and this integration is still a bit unpolished in Purview. So we’re going to have to do some fun stuff, but what we want to achieve at the end is something like this:
The steps to register and create the ChatGPT workspace are pretty well explained in Microsoft’s docs, and especially in Jon’s post, you should be able to follow those without much trouble, so I’m not going to repeat that part here. The area where we ran into more issues was the permissions setup. And the kicker is, you won’t get any errors if you skip this part, the data just won’t show up in Purview’s DSPM for AI. So, this is the part I’ll explain in more detail.
First, to get all this working, you need an Enterprise-type Purview account, meaning it’s tied to an Azure subscription, because monitoring an external system like this (outside of Microsoft 365) comes with some cost. It’s not super high, but it’s there. You can find the setup info for the account here: https://learn.microsoft.com/en-us/purview/purview-payg-subscription-based-enablement
Once you have the account, the next step is to grant it permissions to access the Purview and Graph APIs, and this is where we hit most of the snags, so I’ll try to explain it as clearly as possible.
First thing you need is the “ObjectID” of your Purview account. Let’s assume it’s called “purview-account” and, for this demo, mine would be “11111111-aaaa-bbbb-cccc-123456789abc.” To get that ID, you can either go into the Azure portal like Jon explains in his post, or you can pull it up like we’ll do later for the other IDs, using this command: Get-MgServicePrincipal, with a filter:
Get-MgServicePrincipal -Filter "StartsWith(DisplayName, 'PurviewAccount')"From this account, you need the Id, not the AppID. When you run the command, it’ll return something like this:

That Id is what you need to save: 11111111-aaaa-bbbb-cccc-123456789abc
Next, you need the IDs of the resources you’re going to grant permissions on. These change for each tenant, and you have to get them based on the resource name or the fixed ID, which is in Jon’s blog post, so you can just use these commands (first one is Purview, second one Graph):
(Get-MgServicePrincipal -Filter "AppId eq '9ec59623-ce40-4dc8-a635-ed0275b5d58a'").id
(Get-MgServicePrincipal -Filter "AppId eq '00000003-0000-0000-c000-000000000000'").id
Or you can use the resource names:
- “Purview Ecosystem” for the Purview API
- “Microsoft Graph” for the Graph API


As you can see, the AppId matches what’s in Jon’s post, but if you want to be sure, the name is consistent across all tenants. With that, you should have the two resource IDs you need:
- Purview API: 22222222-aaaa-bbbb-cccc-123456789abc
- Graph API: 33333333-aaaa-bbbb-cccc-123456789abc
Now, you just need the roles you want to assign, which are:
- Purview.ProcessConversationMessages.All on the Purview API (GUID: a4543e1f-6e5d-4ec9-a54a-f3b8c156163f)
- User.Read.All on the Graph API (GUID: df021288-bdef-4463-88db-98f22de89214)
You can look up the GUIDs in your tenant if you’re not sure, but these shouldn’t change, so it should be safe to use the ones I’m giving here. Still, if you want to double-check, these commands will help:
$app = Get-AzureADServicePrincipal -ObjectId 22222222-aaaa-bbbb-cccc-123456789abc
$app.AppRoles | Where-Object -Property Value -eq 'Purview.ProcessConversationMessages.All'

$app = Get-AzureADServicePrincipal -ObjectId 33333333-aaaa-bbbb-cccc-123456789abc
$app.AppRoles | Where-Object -Property Value -eq 'User.Read.All'
With this info, you can assign the roles. Jon’s post uses the New-MgServicePrincipalAppRoleAssignmentcommand, but we used New-AzureADServiceAppRoleAssignment, . I’ll leave you both options here. With the first one, you can create a variable with the parameters, and with the second one, you’ll need to include them one by one. Heads-up: both Jon’s blog and the docs show some brackets that caused us trouble, so be careful. Here’s what the commands would look like with our fake GUIDs:
Using Graph
$params = @{
	principalId = "11111111-aaaa-bbbb-cccc-123456789abc"
	resourceId = "22222222-aaaa-bbbb-cccc-123456789abc"
	appRoleId = "a4543e1f-6e5d-4ec9-a54a-f3b8c156163f"
}
New-MgServicePrincipalAppRoleAssignment -ServicePrincipalId $servicePrincipalId -BodyParameter $params

$params = @{
	principalId = "11111111-aaaa-bbbb-cccc-123456789abc"
	resourceId = "33333333-aaaa-bbbb-cccc-123456789abc"
	appRoleId = "df021288-bdef-4463-88db-98f22de89214"
}
New-MgServicePrincipalAppRoleAssignment -ServicePrincipalId $servicePrincipalId -BodyParameter $params
Using AzureAD
New-AzureADServiceAppRoleAssignment  -ObjectId '11111111-aaaa-bbbb-cccc-123456789abc' -PrincipalId '11111111-aaaa-bbbb-cccc-123456789abc' -ResourceId '22222222-aaaa-bbbb-cccc-123456789abc' -Id 'a4543e1f-6e5d-4ec9-a54a-f3b8c156163f'
New-AzureADServiceAppRoleAssignment  -ObjectId '11111111-aaaa-bbbb-cccc-123456789abc' -PrincipalId '11111111-aaaa-bbbb-cccc-123456789abc' -ResourceId '33333333-aaaa-bbbb-cccc-123456789abc' -Id 'df021288-bdef-4463-88db-98f22de89214'
With that, your Purview account should have the necessary permissions so that the interactions with ChatGPT Enterprise start showing up in DSPM for AI and Activity Explorer. You’ll also be able to find them with eDiscovery and even use them in Communication Compliance and Insider Risk Management.
Heads-up!! This isn’t the full setup, you still need to configure the Key Vault to store the ChatGPT Enterprise keys as explained in this doc. And you need to add the data source to the Purview Data Map, as detailed in Jon’s post, which will require info that OpenAI should provide you. Finally, you have to configure the scans to pull in the ChatGPT Enterprise–generated data into Purview.
Hope this post helps make the integration setup easier for you!
Best regards!!
